Physical Address
60 Ekwema Cres, Layout 460281, Imo
Physical Address
60 Ekwema Cres, Layout 460281, Imo


In 2024, the ability to screen-record on your iPhone has become an indispensable tool for a myriad of tasks, from capturing crucial gameplay moments to creating engaging tutorial videos. With the evolution of iOS, particularly the introduction of the Screen Recording button, users now have seamless access to this feature right at their fingertips. In this comprehensive guide, we’ll delve into the intricacies of screen recording on iPhone in 2024, exploring how to leverage the Screen Recording button and other iOS functionalities to capture and share your screen with ease.
In the fast-paced digital landscape of 2024, the ability to screen-record on iPhones has emerged as a pivotal tool for users across various domains. Whether you’re a gaming enthusiast eager to capture your epic victories, an educator looking to create engaging tutorial videos, or a professional seeking to troubleshoot technical issues, screen recording on iPhone offers unparalleled convenience and versatility. With each iteration of iOS, Apple has continuously refined and enhanced the screen recording feature, culminating in the introduction of the Screen Recording button.
This innovative addition has simplified the process of capturing on-screen content, providing users with intuitive access to a powerful tool. As we delve into the intricacies of screen recording on iPhone in 2024, we’ll explore its significance in today’s digital landscape. Let’s embark on a journey to unlock the full potential of screen recording on iPhone.
With the advent of iOS 11 and subsequent updates, Apple introduced the Screen Recording button, revolutionizing the way users capture their iPhone screens. This nifty feature grants users the ability to initiate screen recording sessions with just a few taps, eliminating the need for third-party apps.
In order to harness the power of screen recording on your iPhone in 2024, it’s imperative to familiarize yourself with the Screen Recording button, a feature seamlessly integrated into the iOS ecosystem. This user-friendly button serves as the gateway to an array of screen recording capabilities, allowing users to effortlessly capture on-screen content with precision and ease. To enable screen recording via the Screen Recording button, follow these simple instructions:
Firstly, navigate to the Control Center settings on your iPhone. This can be accessed by swiping down from the top right corner of the screen for iPhone X or later models, or by swiping up from the bottom of the screen for older models.
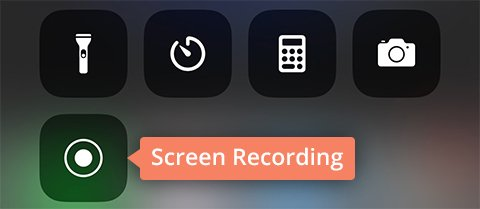
Once in the Control Center settings, locate the option for adding controls and select the Screen Recording button from the list of available options.
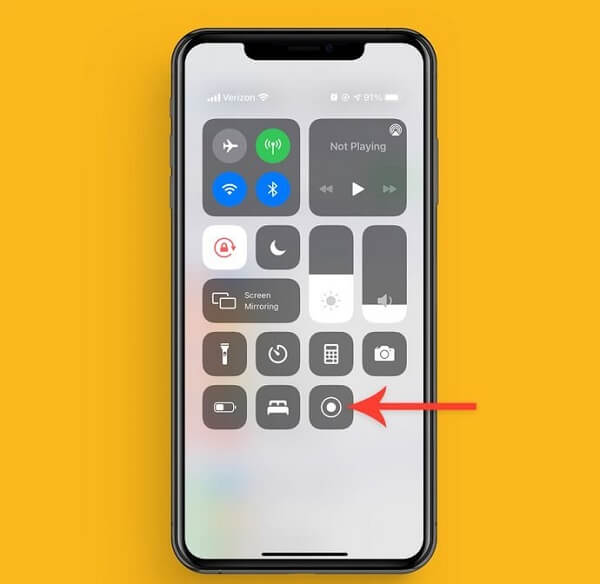
With the Screen Recording button now added to your Control Center, you can easily initiate screen recording sessions with just a tap. This streamlined process ensures that you’re always just moments away from capturing important moments, whether it’s a crucial gameplay sequence or a step-by-step tutorial.
By incorporating the Screen Recording button into your Control Center, you’ll have unparalleled access to the screen recording feature on your iPhone, empowering you to capture, share, and create with unparalleled ease and efficiency.
Now that you’ve enabled the Screen Recording button on your iPhone, let’s dive into the step-by-step process of initiating a screen recording session. Whether you’re using the latest iPhone models like the iPhone X or later, or older models such as the iPhone 8 or earlier, the process remains straightforward and intuitive. Follow these concise instructions to start capturing your screen effortlessly:
Once you’ve tapped the Screen Recording button, your iPhone will display a three-second countdown timer to indicate the start of the recording session. During this time, you can navigate to the screen or app you wish to record. Once the countdown concludes, your iPhone will begin capturing everything displayed on your screen, including any taps or gestures you make.
In addition to the fundamental screen recording capabilities offered by the Screen Recording button, iOS devices boast a range of supplementary features and functionalities to enhance your recording experience. Let’s explore some of these iOS features that can elevate your screen recording sessions to the next level:
By leveraging these additional iOS features, users can unlock new possibilities and enhance the quality of their screen recordings. Whether you’re creating tutorial videos, recording gameplay footage, or capturing important moments, iOS provides a robust set of tools to support your creative endeavors.
When it comes to screen recording on your iPhone in 2024, capturing high-quality audio alongside your video is essential for creating engaging and informative content. Fortunately, iOS offers seamless integration of microphone audio recording into screen recording sessions, allowing users to enhance their recordings with clear and crisp audio commentary. Here’s how you can enable microphone recording and troubleshoot any issues you may encounter:

If you encounter issues with microphone recording during screen recording sessions, try the following troubleshooting tips:
By following these instructions and troubleshooting tips, you can ensure that your screen recordings on iPhone in 2024 are accompanied by crystal-clear audio commentary, enhancing the overall quality and impact of your content.
While the built-in Screen Recording button in iOS provides a seamless solution for capturing on-screen content, users in 2024 also have access to a plethora of third-party screen recording apps that offer additional features and functionalities. These apps serve as alternatives to the native screen recording feature, allowing users to tailor their recording experiences to suit their specific needs. Let’s explore the landscape of third-party screen recording apps available for iPhone users:
Several popular third-party screen recording apps are widely used by iPhone users in 2024. Let’s compare some of these apps and highlight their unique features and functionalities:
By exploring these third-party alternatives, users can expand their screen recording options and unlock a wealth of additional features and functionalities to enhance their recording experiences on iPhone in 2024.
Once you’ve captured a screen recording on your iPhone using the Screen Recording button, the next step is to edit and share your recording with others. In iOS devices, this process is streamlined through the native Photos app, which offers a range of editing tools to enhance your screen recordings before sharing them.
By leveraging the editing and sharing capabilities of the Photos app on iOS devices, you can enhance your screen recordings and share them with others effortlessly. Whether you’re creating tutorial videos, sharing gameplay footage, or documenting important moments, iOS tools provide a convenient and user-friendly platform for editing and sharing your screen recordings.
As you harness the power of screen recording on your iPhone in 2024, it’s essential to understand the best practices and explore various use cases to maximize its potential. By leveraging screen recording effectively, you can enhance productivity, streamline communication, and capture memorable moments.
With that, our journey to mastering screen recording on iPhone comes to a close. Armed with the knowledge and techniques outlined in this article, you’re ready to embark on your screen recording adventures and unleash your creativity on your iPhone in 2024. Happy recording!
If you find the above information useful, kindly follow us on our X or Twitter page, @SiliconAfriTech, where we provide timely and ever-fresh updates on all tech matters. You are sure to whet your appetite with our useful and intellectual contents. Meanwhile, while you are here, here are some recommended posts: